Showing posts with label Rice. Show all posts

Thursday, January 16, 2020

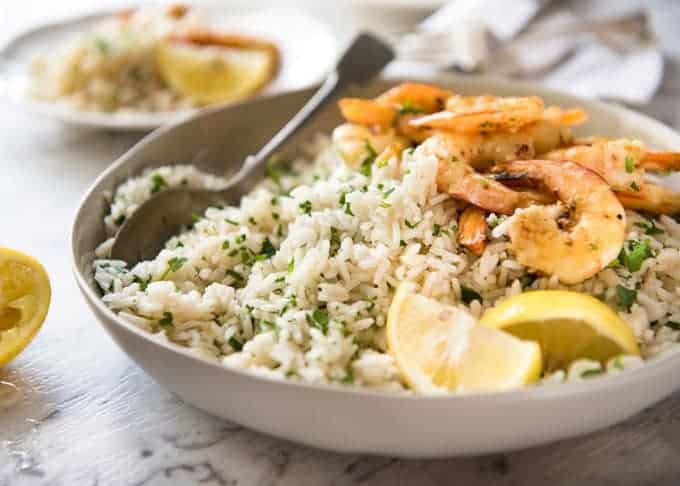
Lemon Rice

This Lemon Rice Pilaf is so delicious, it can be eaten plain! Lovely bright fresh lemon flavours with herbs. www.recipetineats.com
This rice is good enough to eat right out of the refrigerator the next day. The lemon makes it so special. It's worth the effort to get a real lemon, but I have cheated and used bottled lemon juice when I didn't have a lemon. I never have parsley because it just goes bad. But I will put in some dried herbs into the lemon juice while I wait to add it at the end.

Ingredients

1 1/2 tbsp extra virgin oil (or butter)
1 garlic clove , minced
1/2 onion , finely chopped (white, brown, yellow)
1 1/2 cups white rice , long grain (uncooked) (Note 1)
1 1/4 cups chicken broth
1 cup water
1 large lemon (1 tsp zest + 3 - 4 tbsp lemon juice)
3 tbsp finely chopped parsley
3 tbsp finely chopped dill (or sub with parsley, oregano, basil chives, mint)
Salt and pepper

Instructions

  • Heat oil over medium heat in large saucepan or small pot.
  • Add garlic and onion. Cook for 5 minutes or until translucent and sweet.
  • Add rice and stir until rice turns mostly translucent.
  • Add broth and water. Place lid on, bring to simmer then turn heat down to low.
  • Cook for 12 minutes or until water is evaporated.
  • Remove from from stove and rest for 10 minutes (keep the lid on).
  • Remove lid. stir through lemon zest, lemon juice, herbs and salt and pepper to taste.
  • Lovely served warm or at room temperature.
     
    From recipetineats.com

Monday, March 16, 2015

Carrot Couscous

 
This recipe is a bit bland but can be easily spiced up with some salt, white pepper or whatever your spice of choice is. The real draw of this dish is the visual presentation. It is a nearly neon orange couscous with bright green chives sprinkled across the top. It could also easily be modified to include some cooked carrots or any number of ingredients.

Ingredients
  • 2/3 cup carrot juice
  • 1 1/2 teaspoons fresh lemon juice
  • 1/4 teaspoon salt
  • 1/8 teaspoon freshly ground black pepper
  • 1/2 cup uncooked couscous
  • 2 teaspoons olive oil
  • 2 tablespoons chopped fresh chives

Preparation

  1. Bring first 4 ingredients to a simmer over medium-high heat; gradually stir in couscous. 
  2. Remove from heat; cover and let stand 5 minutes. 
  3. Drizzle with oil; fluff with a fork. 
  4. Sprinkle with chives; toss to combine. 
Recipe from cookinglight.com; photo from veganchronicle.blogspot.com

Friday, March 13, 2015

Risotto with Bacon and Kale

 
It's not that impressive to look at. And it requires quite a bit of chopping and prep work. So far, not a good combination. However, the results... oh, the results! It is well worth every second of chopping and roasting and stirring and cooking. This is the first time I have ever made risotto in the oven and I will likely never do it on the stove top again. At this period in my life, any cooking that can be made in a hands off fashion is going to get rave reviews from me. This was delicious and, thanks to the host of veggies, also felt good for you. As with anything like this, it is easy to mess with the vegetables to suit taste. I've made it as-is and also using peas (that I did not roast) instead of the parsnips. Both were delicious. I used far more kale than 3 leaves (in part because it is what makes this dish feel good for you and also because I am unlikely to use kale in other dishes and I wanted to use as much of it as I could get away with).
 
4 servings

Ingredients

  • 4 slices bacon, chopped coarsely
  • 1 large onion, chopped
  • 1 teaspoon kosher salt
  • ½ teaspoon freshly ground black pepper
  • 1 cup Arborio rice
  • 3 cups low-salt chicken broth, plus ¼ to ½ cup
  • 3 tablespoons fresh lemon juice (about 1 large lemon)
  • ¾ cup diced cooked chicken
  • 3 medium curly kale leaves, stemmed and chopped into 1-inch pieces (about 3 cups)
  • 1 carrot, chopped
  • 1 parsnip, chopped
  • 1 shallot, chopped
  • ½ cup freshly grated Parmesan

Instructions


  1. Place a rack in the center of the oven. Preheat the oven to 450 degrees F.
  2. Mix vegetables with olive oil and minced garlic. Roast for ~20-30 minutes.
  3. Reduce oven temperature to 425 degrees F.
  4. In a large heavy saucepan or braising pan, cook the bacon over medium-high heat until crisp, 8 to 10 minutes. Using a slotted spoon, remove the bacon and drain on paper towels.
  5. Add the onions, salt and pepper. Reduce the heat to medium-low and cook until tender, about 5 minutes. Add the rice and stir for 2 minutes. Add 3 cups broth and the lemon juice. Increase the heat and bring the mixture to a boil, stirring occasionally. Cover with a tight lid and bake in the oven for 20 to 25 minutes.
  6. Remove the pan from the oven and return it to the stove over medium-low heat. Remove the lid and stir in the chicken, kale, roasted vegetables and 1/4 cup chicken broth. Stir until the kale is wilted, about 5 minutes, adding extra broth, as needed, until the risotto is creamy. Stir in the cooked bacon and cheese. Ladle into bowls and serve.
 Photo and recipe from giadadelaurentiis.com

Friday, April 18, 2014

Cauliflower "Fried Rice"

 
Skinnytaste.com does it again! I was leary of this one but decided to try it anyway. I, like most parents, am constantly trying to find new ways to get my kids eating vegetables... screw it, like most people I am trying to find new ways to get myself eating more vegetables. This time I made it with all cauliflower but in the future I may play around with the proportions and do half cauliflower/half rice to make it slightly more filling. This recipe is now a combination of the original recipe and our traditional fried rice list of suggestions.

  • 1 medium head (about 24 oz) cauliflower, rinsed (or 1/2 a head if using rice also)
  • Rice (I usually do white although just made it with brown to increase the nutritional value)
  • Veggies, all chopped to bite sized (whatever you have works, although I always try to have mushrooms and some kind of onion... green, white, whatever... frozen peas and carrots reduce the chopping time)
  • Soy Sauce
  • Fish Sauce (apparently it is the key ingredient)
  • Sesame Oil
  • Eggs
  • Protein, if desired, anything works... chicken, beef, shrimp, scallops
Tips

  1. Remove the core and let the cauliflower dry completely. Coarsely chop into florets, then place small batches of the cauliflower in a food processor and pulse until the cauliflower is small and has the texture of rice or couscous – don't over process or it will get mushy. Set aside and repeat with the remaining cauliflower.
  2. If using it, make the rice the day before, let it cool, then put it in the fridge overnight. This prevents the really sticky rice.
  3. Fry up everything by itself. First the protein, then the egg, then the vegetables (I do mushrooms and white onions first because they need more time, then peas and carrots and red pepper separate) then the cauliflower and finally the rice. Once it's cooked it can all go in the same bowl, but saute separate, adding a little sesame oil before each batch of stuff and a little soy sauce in each one.
  4. If you're using green onions add the white/light green portion in with the white onions and mushrooms but set aside the green portion.
  5. Add the cauliflower "rice" to the saute pan along with soy sauce and fish sauce. Mix, cover and cook approximately 5 to 6 minutes, stirring frequently, until the cauliflower is slightly crispy on the outside but tender on the inside.
  6. When frying the rice, if you let it cool overnight it will be clumpy. Dump it in your wok or frying pan and break it up with a wooden spoon. Drizzle soy and fish sauce over the rice while you are breaking it up and stir.  Then spread the rice out as much as you can on the bottom of your pan or up the sides of the wok. DO NOT STIR IT. Let it sit there and fry for a few minutes. Flip it (or stir it) and do that again. Then add everything back in: your veggies, protein, and egg and stir to combine it all together adding soy sauce until your palate is satisfied.
  7. Remove from heat and add the greens of the green onions. Not cooking these at all gives a really nice bite to this dish.
 
Photo and original recipe from skinnytaste.com

Monday, March 10, 2014

Stuffed Acorn Squash with Barley


Ingredients
  • 1 small acorn squash (about 1 1/2 pounds), halved and seeded
  • 2 tablespoons olive oil
  • Salt and pepper
  • 1/4 cup pearl barley
  • 1/2 fennel bulb (about 6 ounces), trimmed of stalks, cored, and chopped fine
  • 1 shallot, minced
  • 3 garlic cloves, minced
  • 1/2 teaspoon ground coriander
  • 1/4 teaspoon minced fresh thyme or 1 pinch dried thyme
  • 1 1/2 ounces Parmesan cheese, grated (about 3/4 cup)
  • 2 tablespoons minced fresh parsley
  • 2 tablespoons pine nuts, toasted
  • 1 tablespoon unsalted butter
  • Balsamic vinegar, for serving
Directions
  1. Adjust oven racks to upper-middle and lower-middle positions and heat oven to 400 degrees. Line rimmed baking sheet with aluminum foil and spray with vegetable oil spray.
  2. Brush cut sides of squash with 1 tablespoon oil, season with salt and pepper, and lay cut-side down on prepared baking sheet. Roast on lower-middle rack until tender (tip of paring knife can be slipped into flesh with no resistance), 45 to 55 minutes. Remove squash from oven and increase oven temperature to 450 degrees.
  3. Meanwhile, bring 2 cups water to boil in small saucepan. Stir in barley and 1/4 teaspoon salt and cook until barley is tender, 20 to 25 minutes. Drain and set aside.
  4. Wipe saucepan dry, add remaining 1 tablespoon oil, and heat over medium heat until shimmering. Stir in fennel and shallot and cook until softened and lightly browned, 5 to 7 minutes. Stir in garlic, coriander, and thyme and cook until fragrant, about 30 seconds.
  5. Off heat, stir in cooked barley, 1/2 cup Parmesan, parsley, pine nuts, and butter. Season with salt and pepper to taste.
  6. Flip roasted squash over and scoop out flesh, leaving 1/8-inch thickness of flesh in each shell. Gently fold cooked squash into barley mixture, then mound mixture evenly in squash shells. (Stuffed squash can be covered loosely with plastic wrap and refrigerated for up to 4 hours. Finish and bake as directed, increasing baking time to 25 to 30 minutes.)
  7. Sprinkle squash with remaining 1/4 cup Parmesan. Bake on upper-middle rack until cheese is melted, 5 to 10 minutes. Drizzle with balsamic vinegar to taste and serve.
 Recipe from America's Test Kitchen

Saturday, February 22, 2014

Butternut Squash Risotto


The original recipe calls for 1/2 of a squash peeled, seeded and diced. Give me a break. I tried once to handle an entire squash and I have never tried again. I buy it at Costco... it comes pre-diced in a 2 lb container. I used it all because I had no plans to make anything else with butternut squash soon. Next time I will spend the extra time to further dice the pieces. I spent a lot more than "several minutes" (as the recipe states) cooking the squash and it still came out a little too tough for my taste. Also we replaced 2 cups of the vegetable broth with white wine (allegedly b/c I only had 4 cups of broth but we probably would have done it anyway. And, as always for me, no parsley. Great dish... will totally make it again.

Ingredients

  • 2 lbs diced butternut squash
  • 3 Tablespoons Butter
  • 1 Tablespoon Olive Oil
  • 1/2 teaspoon Kosher Salt
  • Black Pepper To Taste
  • 1/4 teaspoon Chili Powder
  • 1/2 whole Diced Onion
  • 1-1/2 cup Arborio Rice
  • 6 cups (approximately) Vegetable Or Chicken Broth (low Sodium)
  • Salt And Pepper, to taste
  • 1/8 teaspoon Turmeric
  • 1/4 cup Heavy Cream (less If Desired)
  • 1/2 cup Parmesan Shavings (more For Serving)
  • Finely Minced Parsley, For Serving
Preparation Instructions
  1. Heat 1 tablespoon butter and olive oil in a large skillet over high heat. Add squash and sprinkle with salt, pepper, and chili powder. Cook for several minutes, turning gently with a spatula, until squash is deep golden brown and tender (but not falling apart.) Remove to a plate and set aside.
  2. Heat broth in a saucepan over low heat. Keep warm. (Personally I'm about 50/50 whether I actually heat up the liquid)
  3. Add 2 tablespoons butter to the same skillet over medium-low heat. Add onions and cook for 2 to 3 minutes, or until translucent. Add Arborio rice and stir, cooking for 1 minute.
  4. Reduce heat to low. In 1-cup increments, begin adding broth to the skillet, stirring to combine and gently stirring as the broth is absorbed. As soon as the liquid disappears, add in another cup to cup-and-a-half of broth. Continue this process, stirring gently as the broth incorporates and the rice starts to become tender. Add salt, pepper along the way.
  5. Taste the rice after about 5 cups of broth have been absorbed and see what the consistency is. Add another 1 to 2 cups of broth as needed to get the rice to the right consistency: it should be tender with just a little bit of "bite" left to it.
  6. When the rice is tender, add in the cooked squash and turmeric and stir it in gently. Add the cream and Parmesan shavings and stir until it's just combined. Taste and add more salt and pepper as needed.
  7. Sprinkle minced parsley over the top and serve immediately!
Photo and Recipe from The Pioneer Woman


    Monday, May 27, 2013

    Fried Rice

    Fried Rice
    Photo from Epicurious
    This isn't so much a recipe as a series of tips I've run across that have resulted in some seriously good fried rice.

    Ingredients

    • Rice (I usually do white although just made it with brown to increase the nutritional value)
    • Veggies, all chopped to bite sized (whatever to have works, although I always try to have mushrooms and some kind of onion... green, white, whatever... frozen peas and carrots reduce the chopping time)
    • Soy Sauce
    • Fish Sauce (apparently it is the key ingredient)
    • Sesame Oil
    • Eggs
    • Protein, if desired, anything works... chicken, beef, shrimp, scallops

    Tips

    1. Make the rice the day before, let it cool, then put it in the fridge overnight. This prevents the really sticky rice.
    2. Fry up everything by itself. First the protein, then the egg, then the vegetables (I do mushrooms and white onions first because they need more time, then peas and carrots and red pepper separate) then the rice. Once it's cooked it can all go in the same bowl, but saute separate, adding a little sesame oil before each batch of stuff and a little soy sauce in each one.
    3. When frying the rice, if you let it cool overnight it will be clumpy. Dump it in your wok or frying pan and break it up with a wooden spoon. Drizzle soy and fish sauce over the rice while you are breaking it up and stir.  Then spread the rice out as much as you can on the bottom of your pan or up the sides of the wok. DO NOT STIR IT. Let it sit there and fry for a few minutes. Flip it (or stir it) and do that again. Then add back your veggies, protein, and egg and stir to combine it all together adding soy sauce until your palate is satisfied.

    Sunday, May 19, 2013

    Slow Cooker Shrimp and Artichoke Barley Risotto


    slow cooker, risotto, shrimp, artichoke, barley

    Ingredients:

    3 cups of water*
    3 teaspoons Better than Bouillon Lobster Base*
    1 cup chopped onion
    3 cloves of garlic, minced
    1 9oz package frozen artichoke hearts, thawed and quartered
    freshly ground black pepper, to taste
    1 cup (200gm) pearl barley
    1lb shrimp, peeled and deveined
    2oz parmesan or pecorino romano cheese, grated
    2 tsp grated lemon zest
    4 oz baby spinach

    Directions:

    Bring 3 cups of water to a boil. Whisk in the lobster base and set aside.
    In a nonstick skillet over medium-low heat, saute the onions until tender, about 5 minutes. Add the garlic and cook for 1 more minute, stirring. Transfer to the slow cooker and add the artichoke hearts, black pepper, and barley. Stir in the lobster broth. Cover and cook on high for 3 hours, or until barley is tender and the liquid is just about all absorbed.
    About 15 minutes before serving, stir in the shrimp and grated cheese. Cover and continue to cook on high for another 10 minutes, or until shrimp are opaque. Add the lemon zest and fold in the baby spinach, stirring until it's wilted. Divide among serving bowls and serve immediately.
    *In place of the lobster base and water, you can use 3 cups of seafood or chicken broth.

    Nutrition Facts:

    Servings Per Recipe: 4
    Amount Per Serving
    Calories 406.6
    Total Fat 7.0 g
    Saturated Fat 3.5 g
    Polyunsaturated Fat 1.0 g
    Monounsaturated Fat 0.3 g
    Cholesterol 184.8 mg
    Sodium 917.9 mg
    Potassium 677.3 mg
    Total Carbohydrate 52.3 g
    Dietary Fiber 11.3 g
    Sugars 0.2 g
    Protein 35.6 g

    Recipe from  www.carascravings.com

    Hazelnut-Mushroom Pilaf


    Photo Credit: Random Allrecipes User

    INGREDIENTS:

    1/4 cup butter
    1/2 cup uncooked long-grain rice
    1/4 cup uncooked orzo pasta
    1/2 cup sliced fresh mushrooms
    1/2 cup chopped onion
    1/4 cup minced celery
    2 cups chicken broth
    2 tablespoons chopped fresh parsley
    1/4 teaspoon dried marjoram
    1/4 teaspoon ground black pepper
    1/2 cup chopped toasted hazelnuts

    DIRECTIONS:

    1. Place a large skillet over medium-low heat. Melt butter, then saute rice, orzo, mushrooms, onion, and celery. Stir constantly until rice is lightly browned.

    2. Mix in chicken broth, parsley, marjoram, pepper, and hazelnuts. Bring to a boil, then reduce heat to low, cover skillet, and allow to simmer 15 minutes. Remove from heat and let stand 10 minutes before serving.